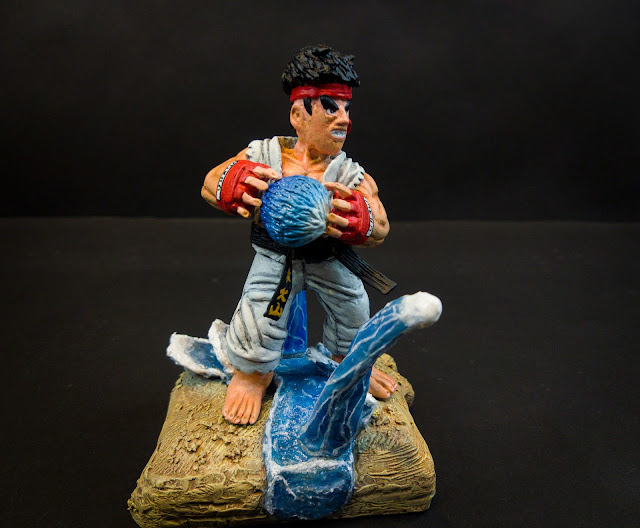
How to make Streetfighter Ryu with 3D Pen
In this tutorial, we will learn how to make Ryu from Streetfighter with 3D Pen. We are are going to use PLA filament 1.75 with any color of your choice along with a soldering iron to smooth the surface.STEP 1
● Download and print out the 3d pen template of Ryu that you will find it available here
● Cover the paper template with a clear tape or use a drawing pad to trace the sketch.
● Draw the outline of Ryu body using the 3D Pen and use it as a reference
(Optional).
●
Make the head first making a ball shape and then carve it to shape the (cheeks, nose and eyes using the soldering iron).
●
Add eyes on top of his head, nose below it (use an eyeball as reference),
mouth below that (again, use an eyeball as reference).
● Carve the line dents on the belt, headband and the hands with the use of the soldering iron.
● Now you are ready to assemble all the parts together, and prepare them
for painting. We will start by priming the figure so the paint will adhere
on plastic.
● Draw each body part separately to facilitate the smoothing and sanding
process later.
● Don't worry about making them perfect! They'll look better when they're
sanded and smoothed, anyway.
STEP 3
● After the separation of body parts use the soldering iron at 220c
using a knife tip to smooth each part and carve the details on them
according the reference image.
● As you make use the sandpaper or a rotary tool (you can find them
available
here) to smooth the parts prior painting it. Starting with 220 grit and
finishing with 600 or 1000 gradually depending the level of smoothness we
want to achieve on the surface.

|
| Body Parts smoothed with soldering iron |
● Make ears using the 3d pen on top of the head.
● Using the template repeat the same steps again to create the
(arm, hands the legs).
STEP 4
● Draw 2 small rectangles and bent them using a jet lighter to
attach them on the figure. Those will be used as headband
(hachimaki) and the belt respectively.

|
|
Belt and headband attached to the figure |
● Carve the line dents on the belt, headband and the hands with the use of the soldering iron.
● Shape the muscles on the chest, neck, arms, gloves, and feet,
with the soldering iron using needle tip and be sure to watch the
template as a reference to make the proportions correctly. If you are
experienced enough you can draw the muscle details and the gloves
directly with the 3d pen.
● Make a ball shape and carve it with soldering iron that will
represent the hadoken move of Ryu.
● You can optionally make the stand base provided in the template along
with the seawave effects or use any other base of your choice to
decorate the Ryu figure.
STEP 5
● Prime the figure with grey primer spray and leave it to dry for 12 to 24 hours to fully dry.
● Prior painting its best to sand the primer lightly so the acrylic paint will adhere better.
● Paint each part separately with paintbrush or airbrush using acrylic or any other type of your choice. Its best to thin your color and paint in light coats to get an even surface results.
 |
| Stand Base Painted |
We hope you enjoyed this tutorial on how to make Ryu from Street Fighter. We’re sure you’ll have fun creating your own characters with our free 3D Pen templates!


COMMENTS