Parallax effect

How to make WW2 Soldier Figure

How to make WW2 Soldier Figure with 3D Pen

WW2 Soldier Figure 3D Pen

For this 3d pen project project we are going to use PCL only with a variety of filament colors. In addition we will need a soldering iron with a temperature regulator at 100c celcius degrees for smoothing the surface or a jet lighter and a piece of flat metal.

The particular 3D Pens are well known to use low temperature for safety reasons and they use ONLY PCL 1.75mm filament exclusively. You can find them available to buy here.


STEP 1

We will make the body by using the 3d pen template wrapping some paper tape around the aluminum wire and cover it with filament. It easier to smooth the plastic by using a jet lighter and press it with an exacto knife, tweezers or other piece of metal. Alternatively we can use the soldering iron at lowest temperature possible (100c preferably) with quick moves to avoid any unwanted results.


WW2 Soldier Figure Frame      WW2 Soldier Figure Covered in Filament

STEP 2

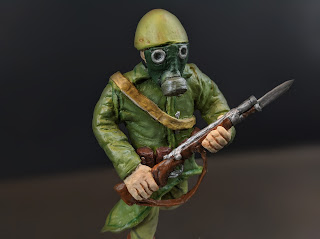
With the the help of the drawing template we will draw the rest of the parts (backpack, hands, head, helm, boots, weapon, ammo pouch) and fuse them on the body. We can easily carve the details on plastic with a nail or a sharp object while its warm.

WW2 Soldier Figure Body Front      WW2 Soldier Figure Body Front


STEP 3

As we finished with the making and assembling all the parts we start priming all parts with acrylic gesso for the paint to adhere better. It is necessary to leave it at least 10 hours to dry prior painting it and sand it with 240 grit sandpaper for smooth surface.

WW2 Soldier Figure Body Primed       Gas Mask Primed

STEP 4

We start painting our figure with acrylic paint using an airbrush or a paintbrush. For better results it is recommended to use modelling paint such as (Vallejo, Gunze Sangyo, Tamiya etc.) instead of craft paint for better visual results and to avoid peeling.

A coat of satin varnish or mat is also a good choice to protect the color and give the figure a shiny look.

WW2 Soldier Figure Painted Back Side            WW2 Soldier Figure Painted Front Side


STEP 5 (OPTIONAL)

Last but not least, the final step is to make a stand base for the figure, by covering a piece of wood with some snow modelling paste and attach the leg of the figure with some superglue. We can also add some tiny details such as grass tufts made from 3d pen filament.

Base covered in snow


For more 3D Pen Projects you can check them in the blog here. If you have any ideas for future projects leave a comment below or use the contact form, feel free to share the project with your friends on Social Media.

COMMENTS

Name

3d,4,3d pen,18,3d pen art,4,3d pen creations,13,3d pen fallout,1,3d pen templates,5,3d pen tutorial,2,3d plastic fantasy,12,3d printing filament,4,3d printing pen,13,3d simo,5,3d simo basic,1,3d simo kit,1,3d simo multipro,3,3d yoshi,1,8bit,1,art,7,battle for azeroth,1,battle for azeroth 3d pen,1,bethesda,1,bowser,2,bowser 3d,1,bowser 3d pen,1,breath of the wild,1,bullet bill,1,captain america,1,crash bandicoot,1,crash bandicoot action figure,1,crash figure,1,Cup Holder,1,dc comics,1,dc superman,1,dc universe,1,diy,4,fallout,1,fallout 3d,1,fallout 3d pen,1,figure,9,filament,2,forever 3d pen,1,handmade,4,heroes of the storm samuro,1,how to make figure,3,hylian shield,1,keychain,1,lemming 3d figure,1,making battle pet,1,making bowser,1,making bullet bill,1,making captain america shield,1,making fallout vault boy,1,making hylian shield,1,making nabbit,1,making samuro the blademaster,1,making super mario,1,making superman logo keychain,1,making voror,1,making voror gleaming blade of the stalwart,1,making warcraft figure,2,making yoshi,1,mario,2,marvel,1,marvel series,1,Mortal Kombat,1,Mortal Kombat 1,1,Mortal Kombat Cup Holder,1,nabbit 3d,1,nabbit 3d pen,1,new super mario bros,3,new super mario bros yoshi,1,new vegas,1,newsupermario,2,Nintendo,1,nintendo switch,1,pla,1,polaroid,1,polaroid 3d pen,1,polaroid 3d play pen,1,resident evil,1,resident evil 3,1,resident evil 3 remake,1,resident evil nemesis,1,Ryu,1,Ryu figure,1,scribbler,4,sculpture,2,smoothing pla,4,Streetfighter,1,Streetfighter V,1,super mario,1,super mario odyssey,1,superman,1,supermario,1,the legend of zelda,1,vault boy,1,warcraft 3,1,warcraft 3 reforged,1,warcraft 3d pen,1,world of warcraft 3d pen,1,wow bfa,1,WW2 figure soldier 3d figure,1,yoshi,1,yoshi 3d pen,1,
ltr
item
3D Plastic Fantasy - 3D Pen Art: How to make WW2 Soldier Figure
How to make WW2 Soldier Figure
How to make WW2 Soldier Figure with 3D Pen
https://blogger.googleusercontent.com/img/a/AVvXsEi00o6gdNyfJJTTGqKou618uF6awWJerPKedrci3w8tR0iFHlDKyd4Hj-4kdQUNKUzbDfS9F602nSnIOXQrVQ4PFUlFWWrrmQQH1_VoiARjsc5Zi6lTcufIH1r46X9D-0N-4v3dfXUaPX8Ve23C2YHUqyijKA5ikVp9d9sImsSkSToky1k9nI2am1w7Qg=w320-h239
https://blogger.googleusercontent.com/img/a/AVvXsEi00o6gdNyfJJTTGqKou618uF6awWJerPKedrci3w8tR0iFHlDKyd4Hj-4kdQUNKUzbDfS9F602nSnIOXQrVQ4PFUlFWWrrmQQH1_VoiARjsc5Zi6lTcufIH1r46X9D-0N-4v3dfXUaPX8Ve23C2YHUqyijKA5ikVp9d9sImsSkSToky1k9nI2am1w7Qg=s72-w320-c-h239
3D Plastic Fantasy - 3D Pen Art
https://www.3dplasticfantasy.com/2022/01/how-to-make-ww2-soldier-figure.html
https://www.3dplasticfantasy.com/
https://www.3dplasticfantasy.com/2022/01/how-to-make-ww2-soldier-figure.html
true
6392863298849358339
UTF-8
Loaded All Posts Not found any posts VIEW ALL Readmore Reply Cancel reply Delete By Home PAGES POSTS View All RECOMMENDED FOR YOU LABEL ARCHIVE SEARCH ALL POSTS Not found any post match with your request Back Home Sunday Monday Tuesday Wednesday Thursday Friday Saturday Sun Mon Tue Wed Thu Fri Sat January February March April May June July August September October November December Jan Feb Mar Apr May Jun Jul Aug Sep Oct Nov Dec just now 1 minute ago $$1$$ minutes ago 1 hour ago $$1$$ hours ago Yesterday $$1$$ days ago $$1$$ weeks ago more than 5 weeks ago Followers Follow THIS CONTENT IS PREMIUM Please share to unlock Copy All Code Select All Code All codes were copied to your clipboard Can not copy the codes / texts, please press [CTRL]+[C] (or CMD+C with Mac) to copy